Table of Content
Introduction
If you have a WordPress website, understanding its performance and user interactions is crucial for success.
Google Analytics 4 (GA4) and Google Tag Manager (GTM) are free powerful tools by Google. When used together, they can provide useful insights into your website’s performance and user behavior.
This guide will show you the process of setting up GA4 using GTM on your WordPress site. So you can make data-driven decisions and optimize your online presence.
So Let’s get started!

Understanding GA4 and GTM
What is Google Analytics 4 (GA4)?

Google Analytics 4 (GA4) is the latest version of Google’s web analytics platform.
It is designed to provide a complete view of your website’s performance across web and app environments. GA4 has replaced the previous version of Google Analytics: Universal Analytics. And it comes with cool features that the old one didn’t have:
- You can see both web and app data together.
- You can Integrate Google BigQuery for no extra cost.
- Setup Advanced User Engagement metrics in one click.
Track Complete user experience with Events. - There are special reports you can use right away to learn more about your users.
- It works really well with other Google tools you might use, like Google Ads and Google Search Console.
What is Google Tag Manager (GTM)?

Google Tag Manager(GTM) is a free tool by Google that allows you to manage and deploy tracking codes on your website without using any code.
You can tag Google Analytics, Google Ads, Facebook Pixel, etc. easily with your website using GTM. GTM offers several benefits:
- Custom tracking code creation tailored to your website
- Helps you deploy tags in Google platforms or third-party websites.
- Gives you one dashboard to see and manage all your tags.
- Allows you to test and fix your tags with preview and debug mode.
- Can make your website work faster and better.
- Keep your data accurate and safe.
Benefits of Using GA4 and GTM Together:
Combining GA4 and GTM offers several advantages:

1. Installing Google Tag Manager on WordPress
1.1 Creating a GTM Account
- Go to the Google Tag Manager and sign in with your Google account.
- Click on the ‘Create Account” button or “Click here to create an account” section — to create a new account.

- Enter a name for your account, such as your business name.
- Select your country, and choose whether to share data anonymously with Google.
- Next, you need to create a container for your website. A container is where you will store and manage your tags.
- Enter a name for your container, such as your website domain, and select ‘Web’ as the target platform.
- Click on the ‘Create’ button to continue.
- You will see a popup window with the Google Tag Manager terms of service agreement. Read and accept the terms and click on the ‘Yes’ button.
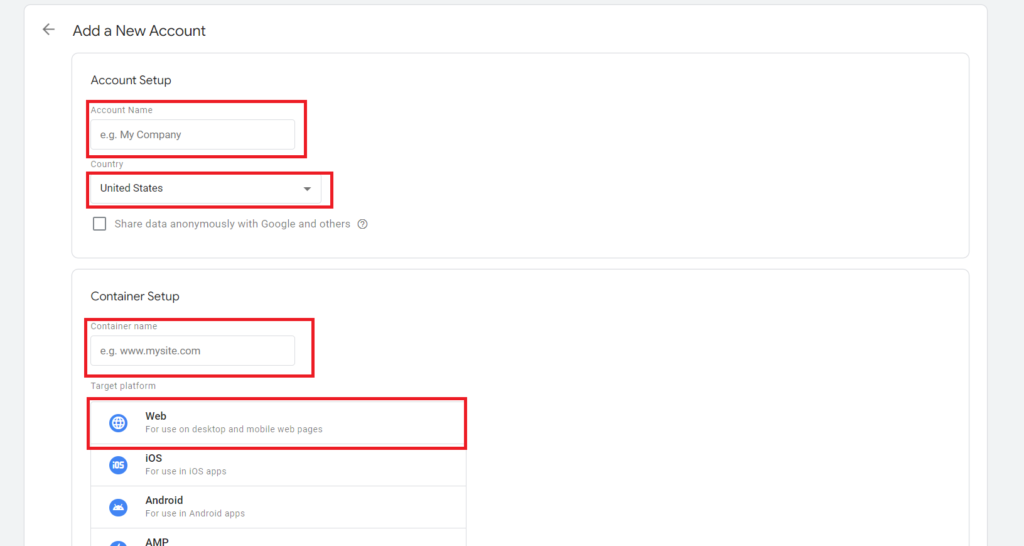
- You will now see two code snippets that you need to copy and paste on your website. One is for the header section and the other is for the body section. Keep this window open as you will need these snippets later.
- If you are unable to locate a snippet, click on the tag (code started with GTM -), and a popup will appear.

1.2 Install the Header Footer Code Manager plugin on WordPress
- Log in to your WordPress admin panel and navigate to Plugins > Add New.

Search for ‘Header Footer Code Manager’ or ‘hfcm’, which will lead you to the plugin “Header Footer Code Manager by 99 robots.”
- Install and activate the plugin.

- Once activated, find HFCM on the bottom menu on the left-hand side and click on “Add New.” And the “Add New Snippet” page will appear.
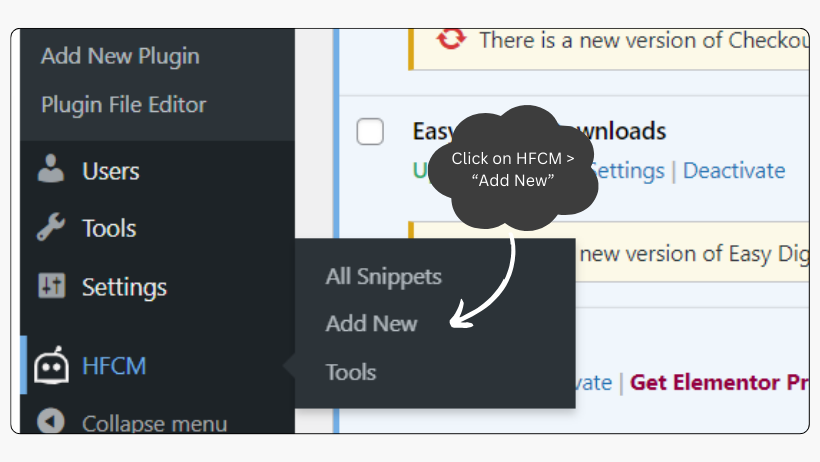
1.3 Add the GTM snippets on the ‘Add new snippet’ page
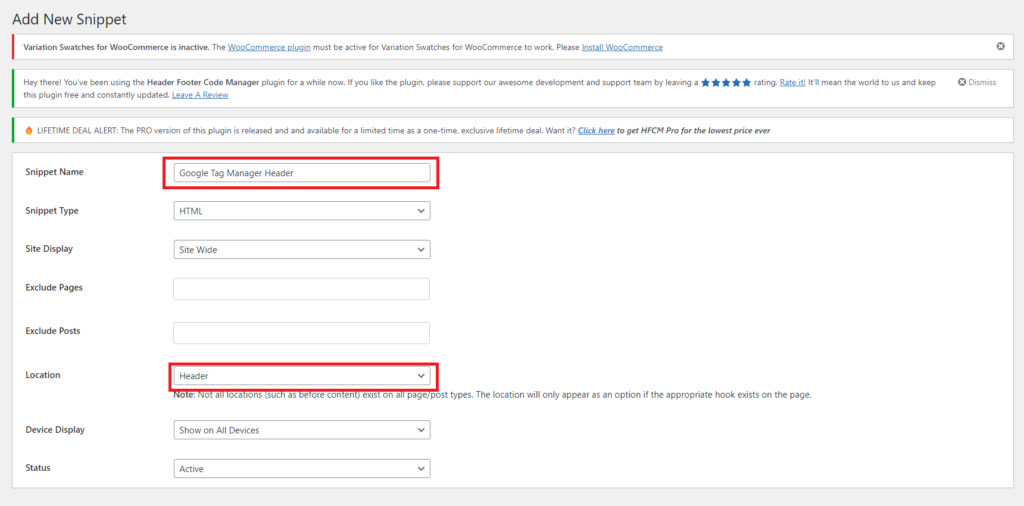
- On the ‘Add new snippet’ page, provide a name for your snippet, such as ‘Google Tag Manager Header,’ as we will be adding two codes, one for the header and one for the footer.
- Select ‘Site-wide‘ as the Site Display.
- Move down to the location section and choose ‘Header‘ as the position to insert the snippet.
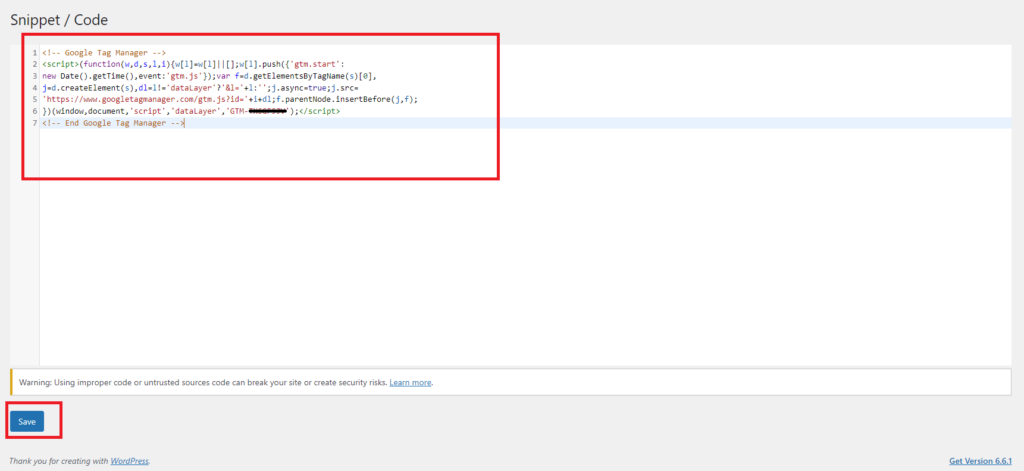
- Paste the header snippet copied from GTM into the code box.
- Navigate to the bottom of the page and click the ‘Save’ button to save the snippet.
- Repeat the same steps to add another snippet for the body section. This time, select ‘Footer’ as the location and paste the body snippet copied from GTM. Click on the ‘Save’ button to save the snippet.
1.4 Verify GTM Installation
- Visit tagassistant.google.com, where you will see Tag Assistant Beta, a new tag assistant extension by Google known as — Tag Assistant Companion. Click on the “Add domain” button.

- You will see a popup to connect Tag Assistant with your site. Enter your website’s URL and click on “connect.”

- A new window will open, displaying Tag Assistant details. Look for the tag assistant tab at the bottom right of the page, marked with a green/blue checkmark. This indicates that GTM is correctly installed on your website.
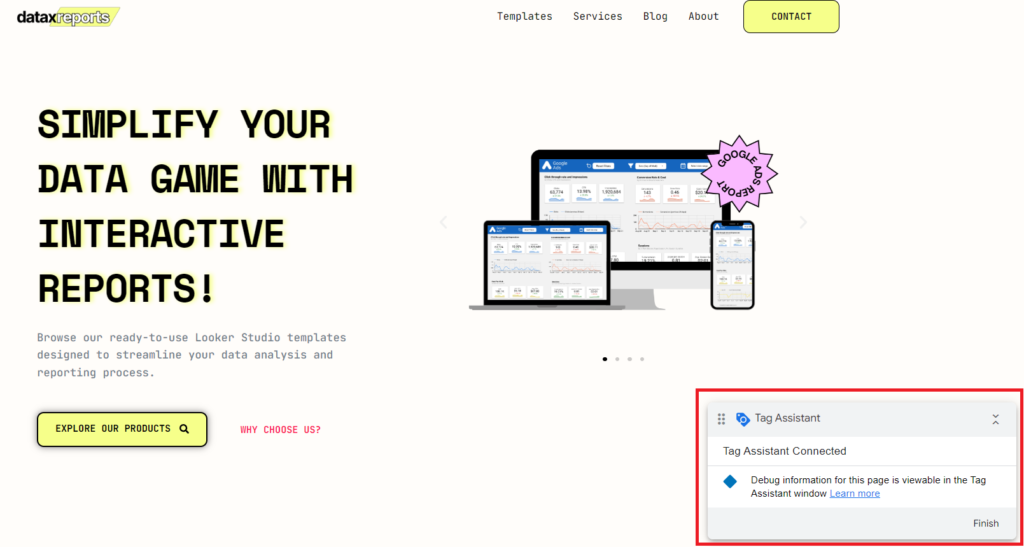
- For more details, including the container ID and the tags firing on your website, you can click on the GTM tag on the tag assistant domain.

2. How to Set Up Google Analytics 4 Using the Google Tag
After you have installed Google Tag Manager (GTM) on your WordPress website, you can use the Google tag to set up Google Analytics 4 (GA4).
The Google tag is a new tag that can be used for different Google products, such as Google Analytics, Google Ads, Google Optimize, etc.
To set up GA4 using the Google tag, you need to follow these steps:
2.1 Create the Google Tag and enter the GA4 Measurement ID
- Visit the Google Tag Manager website and sign in with your Google account. Choose the container created for your website and click on the ‘Tags’ tab. Select the ‘Add a New Tag’ text to generate a new tag.

- A box will appear on the right where you can input the tag details. Start by naming your tag, such as ‘Google Tag – GA4.’ Click on the ‘Tag Configuration’ box and choose ‘Google Analytics‘ from the featured tag types. Then, select “Google Tag.“
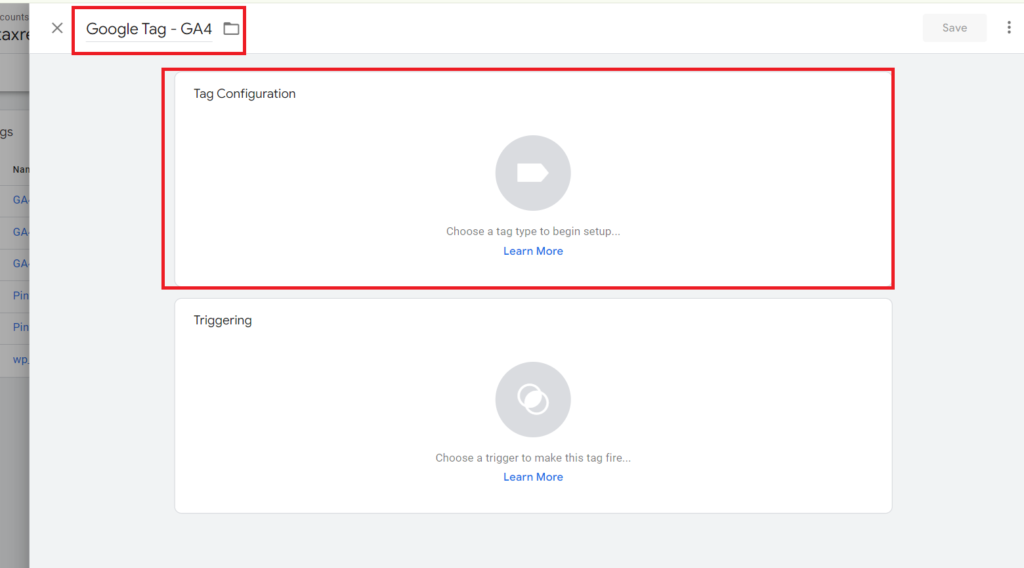
A popup will appear and here you have to add your Google Analytics 4 Measurement ID.
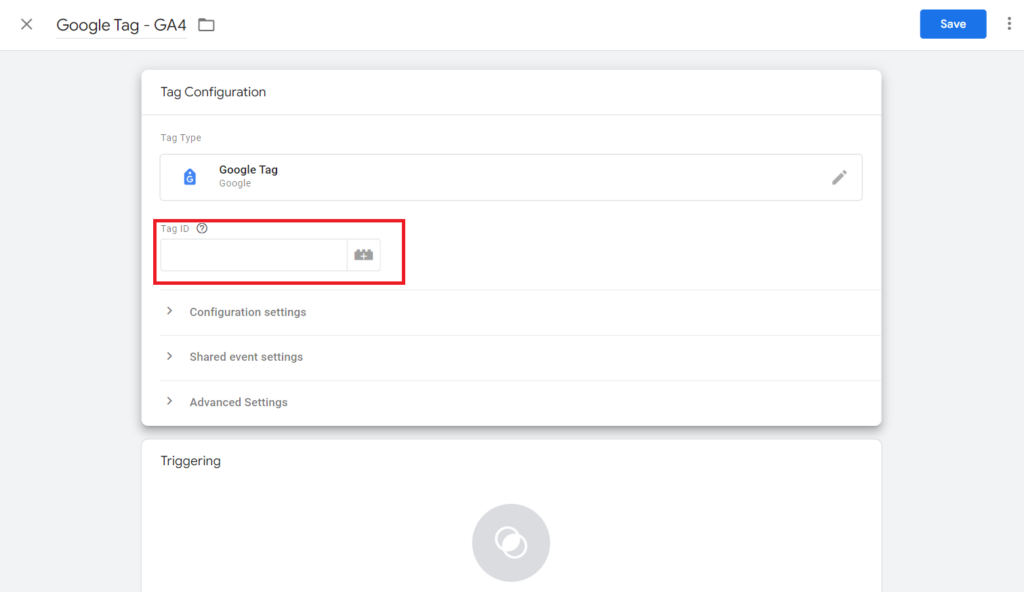
- To find your GA4 Measurement ID, navigate to the Google Analytics website, sign in with your Google account, and choose the GA4 property created for your website.
- Click on the ‘Admin‘ button at the bottom left corner. Under the ‘Data collection and modification‘ column, access ‘Data Streams.’
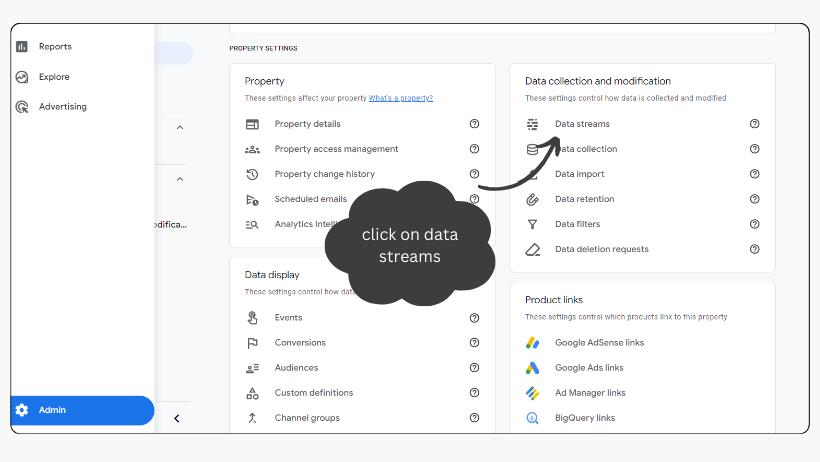
- And choose the web data stream created for your website.
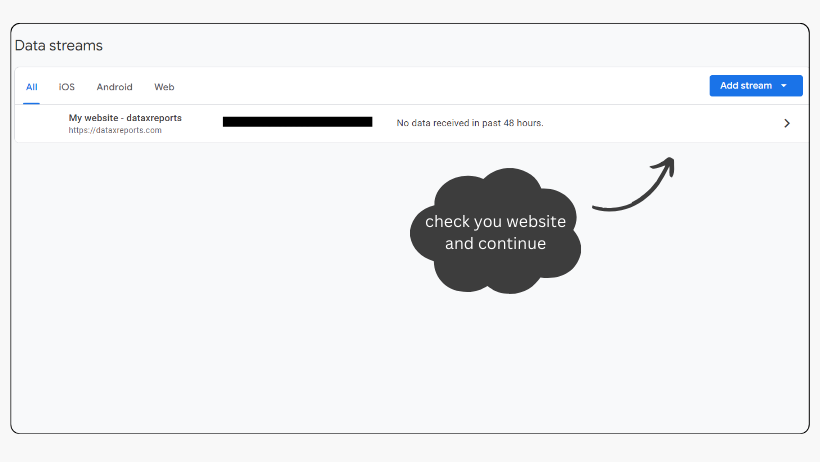
- Your GA4 Measurement ID, starting with ‘G-‘, will be visible.
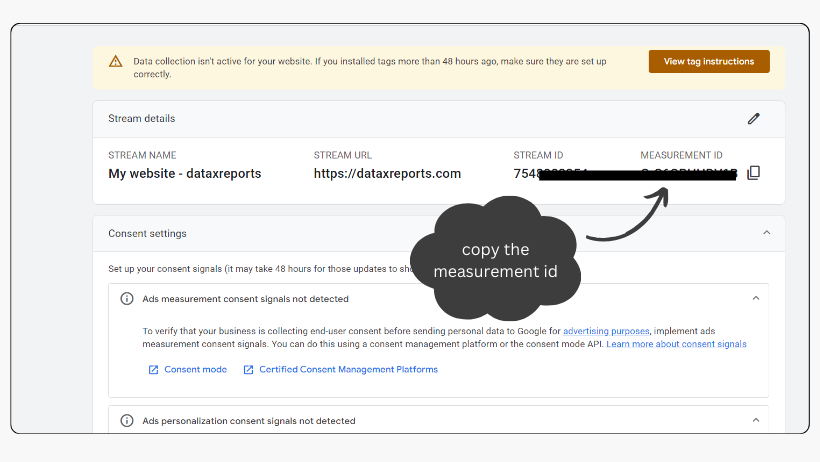
- Copy the Measurement ID and paste it into the ‘Tag ID’ field in GTM.
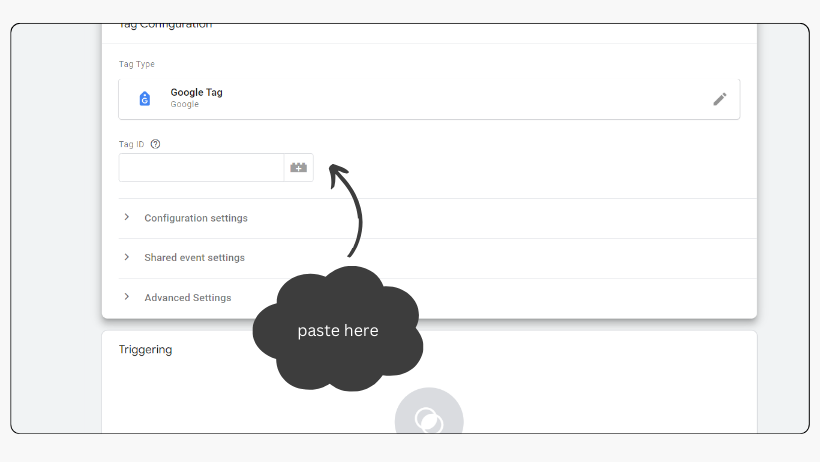
2.2 Define the trigger as the initialization trigger for all pages
- Under the ‘Tag Configuration’ box, you will see a box for ‘Triggering’. This is where you define when and where you want your Google tag to fire on your website.

- Then select Initialization – All Pages trigger.
- You should select this trigger to fire any tags that need to execute before other triggers.
Note: Initialization triggers are designed to fire before all other triggers except Consent Initialization trigger.
- You will then see a summary of the trigger settings, including the trigger type, name, and conditions. No adjustments are needed here, as this trigger is already configured to fire on all pages of your website.
- Finally, click on the ‘Save’ button to preserve your tag settings.
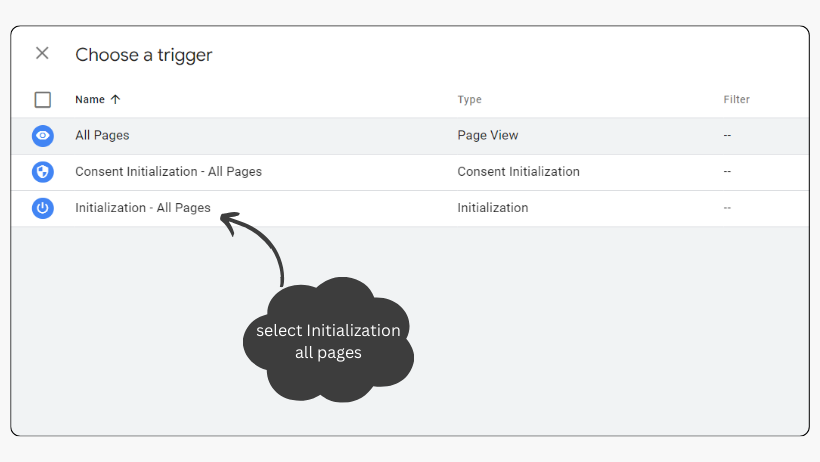
2.3 Test the tag using the preview mode and the debug view
Before publishing your tag, it’s crucial to test it to ensure it functions as expected. You can utilize the preview mode and the debug view to conduct this testing.
- The preview mode allows you to observe how your tag behaves on your website without impacting your live data. The debug view enables you to monitor the events and parameters your tag sends to GA4 in real-time.
- First we go to the preview mode. Open your GTM and click on the ‘Preview’ button located at the top right corner of your GTM account.

- This action will open a new window with a popup asking you to “Connect Tag Assistant to your site.” Enter your website URL and click on ‘connect.’

- This will open another window displaying your website with a message confirming that Tag Assistant is connected. Minimize this window for later reference.
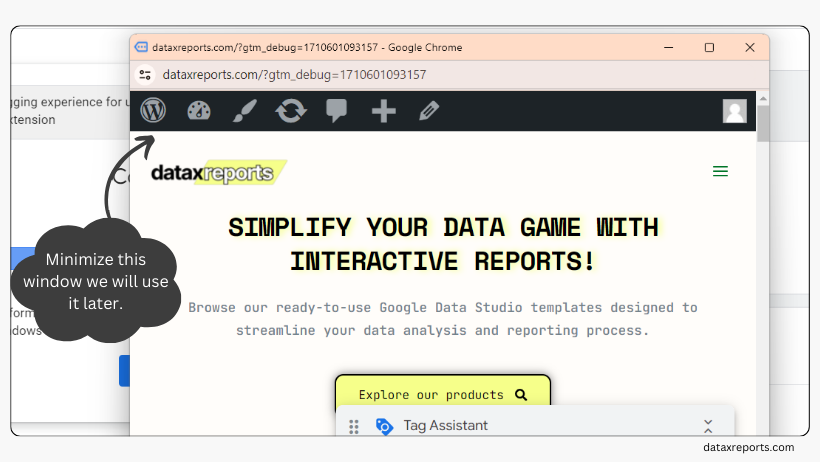
- On the same page, you’ll notice a box with a message indicating that your website is successfully tagged. Click on ‘continue.’

- Now, under the ‘tags’ section, you’ll find a box labeled ‘Tags Fired.’ Click on it to see the details.

- You’ll then see the tag details page, confirming that the tag has fired the “Initialization” event as expected.

Next, navigate to Google Analytics 4 to verify whether it has received the data using the debug view.
- First select the GA4 property created for your website. Make sure it’s the same you setup for your website.

- Then click on ‘Admin,‘ and scroll down. Under the ‘Data Display’ section, you’ll find the ‘DebugView’ button. Click on it.

- To test your tag, you have to interact with the website (the one we minimized before).
- Then, return to the debug view to observe the events collected. You’ll see the events and parameters sent by your Google tag to GA4 on the debug view screen.
- Click on each event for more details, such as the event name, value, and parameters.

2.4 Publish the container to apply the changes
After you have tested your tag and verified that it works as expected, you can publish your container to apply the changes to your website.
- To publish your container, click on the ‘Submit’ button at the top right corner of GTM. You will see a popup window that asks you to enter a version name and a description for your changes.
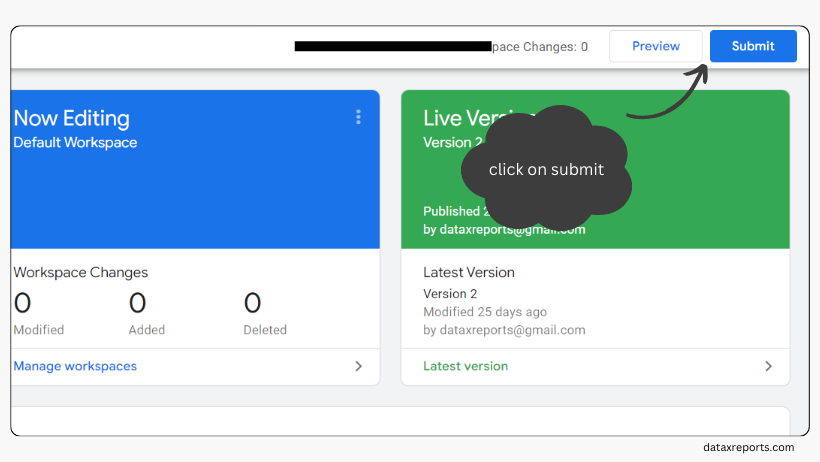
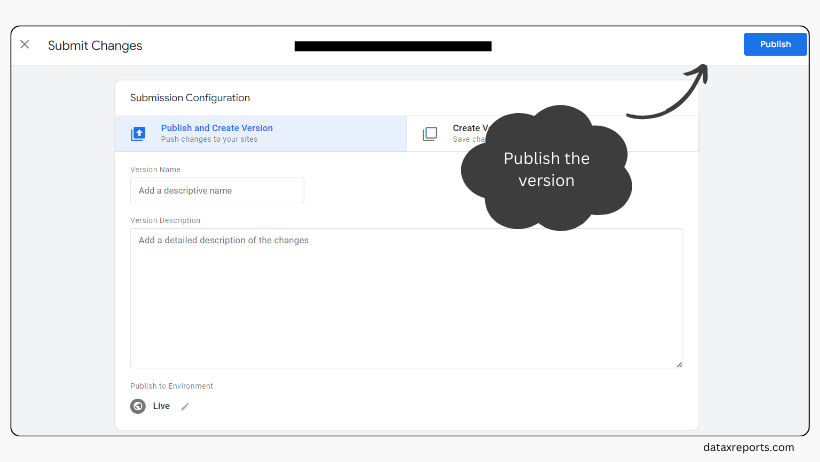
- Enter a name and a description that summarize your changes, such as ‘Added Google tag for GA4’.
- Click on the ‘Publish’ button to publish your container. You will see a message that says ‘Container version published’.
Congratulations, you have successfully set up GA4 using the Google tag on your WordPress website. You can now start collecting and analyzing data from your website using GA4.
Best Practices for GA4 and GTM
3.1 Organizing Your GTM Container
– Use a consistent naming convention for tags, triggers, and variables.
– Create folders to group related tags and triggers.
– Use workspaces for testing before publishing changes.
3.2 Setting Up Key GA4 Events
– Configure important events like form submissions, video plays, and scroll depth.
– Use GTM’s built-in triggers and variables to streamline event setup.
– Regularly review and update your event tracking strategy.
Conclusion
To take full advantage of your new setup:
- Explore GA4’s reporting features to gain insights into your audience.
- Set up custom events to track specific user interactions.
- Use the data to optimize your content and improve user experience.
For a more detailed view of your traffic data, check out our comprehensive GA4 Insights Pro report.
